
All posts by Wayne
Andrew Skurka // Adventurer, Guide, Speaker, Writer
this is the content
Layering for Beginners @ Backpacking Light
Backpacking and Hiking with an Umbrella
Backpacking and Hiking with an Umbrella
Francis is an umbrella advocate, eschewing typical rainwear. Find out why he’s backpacked over 12,500 miles with an umbrella… and decide if you should follow his lead.
Introduction
When I’m backpacking, hikers often ask, “Why are you carrying an umbrella?” An umbrella seems out-of-place in the wilderness. It’s for city folk, not for macho backpackers. However, hiking with an umbrella is not as foolish as it looks.

Left to right: Dave Claugman, a section hiker getting blasted by the sun near Sonora Pass on the PCT, me using my umbrella, and Maiu Reismann (my PCT partner) wondering where on earth I’m going. Photo by Jon “Basmati” Stewart.
I’ve used umbrellas on the Appalachian Trail, Pacific Crest Trail, and Continental Divide Trail. Umbrellas have also protected me during my treks across Costa Rica’s Osa Peninsula jungle, Slovakia’s Tatra Mountains, and Ukraine’s tallest peak. In addition, they’ve served me well during my thru-hike across the Pyrenees and El Camino Santiago. I’ve used rain jackets, but in general, I find an umbrella superior.
Rain Protection
Umbrellas protect backpackers in rainstorms (and even snowstorms), offering more rain protection and ventilation (delaying overheating) than a jacket. For example, on the Appalachian Trail, Lisa Garrett (my hiking partner) wore a rain jacket, but by the time she got to the top of a mountain, she would be soaked – in sweat, not rain. That moisture would help take her down the path of hypothermia because of the cold winds at the summit. An umbrella helps regulate your temperature because it lets the heat that your body generates while hiking evaporate quickly. Even “breathable” rain jackets trap a significant amount of heat and water vapor. With the umbrella, I just needed to slip on an insulating layer near the top, before my body began to cool on the descent.
Lisa discovered that I was staying drier than she was, so after 200 miles, she sent her rain jacket home and used a GoLite umbrella for the 12 remaining states.
Furthermore, I love umbrellas for off-and-on rain periods. A rain jacket wearer has to either go through a complex, time-consuming ritual every time he removes or dons his rain jacket. Meanwhile, an umbrella user can effortlessly whip out or stow her umbrella during intermittent rain.

Umbrellas can be snow protection too! Sept 21 in the Pyrenees in Spain. A $5 collapsible umbrella was good enough to protect me as the rain turned to snow as I gained elevation.
Sun Protection
What did your mom tell you to do when it was cold outside?
“Put on a hat!”
OK, my mom didn’t say that either, but she should have.
It’s smart to put on a hat when it’s cold. You lose heat from any exposed body part, and a hat is extremely effective at keeping that heat to yourself. That is precisely why I prefer an umbrella over a sunhat when the sun is beating down. The sunhat just traps heat in, offsetting most, if not all, the benefits of the limited shade it delivers. Without a wide brim, the hat doesn’t offer that much shade, and a wide brimmed model risks being blown away by a gust of wind.
An umbrella provides a ton of shade (usually down to the knees) and lets heat escape from your head, keeping you cool. Moreover, you can shed layers and walk around shirtless (or in a sports bra, if you’re a woman) and enjoy the airflow and shade. Hiking under shade all day will dramatically lower your water needs, especially on hot days. If you don’t have an umbrella, you’ll need to carry at least an extra liter of water to make up for the sweat-related water loss. You’ll have to carry more sunscreen to protect a greater portion of your body. All this extra weight will be more than a lightweight umbrella.

Exposed in the Sierra Nevada. The higher you go, the stronger the UV rays. On a long hike, an umbrella protects your body from prolonged sun exposure while allowing you to wear minimal clothing during the hot days.
Other Umbrella Uses
- Micro-shelter: When it’s pouring rain, it’s awkward to study a map or to prepare a meal, but an umbrella’s canopy makes it much more pleasant. It’s also nice to be able to take a shady break in the desert, where there’s no shade if you didn’t bring it.
- Eyeglass protector: If you wear glasses, umbrellas let you gaze around easily without getting the glasses wet. A rain jacket’s hood forces you to stare at the ground or have wet glasses.
- Tarp hole plug: If rain is sneaking into your tarp (because you did a sloppy set-up), an umbrella can plug that hole.

A June 7 snowstorm surprised me in Wyoming’s Wind River Range. My umbrella helped me plug a “hole” in my sloppy tarp set-up.
- Anchor point: I’ve sometimes used an umbrella as an anchor for my tarp when trees were lacking.

On the actual Divide in the Wind River Range, nearly 12,000 feet. I used my umbrella as a “pole” to turn a rock and a hard place into a cozy home.
- Windbreaker: Need to light a match or protect a stove from brisk wind? An umbrella can help.
- Spider web destroyer: When you hit the Appalachian Trail early in the day, you run into spider webs often (until you bump into someone going the opposite direction). An umbrella is more effective than sticks at clearing your path.
- A poor man’s pack cover: It won’t help much in constant heavy rain, but an umbrella will protect a significant portion of your backpack during a drizzle or light rain – which means your backpack won’t gather water weight.
- All-purpose stick: A poor man’s ice axe. A short stick to balance on when fording a river. A way to defend yourself against a snake.
- Privacy barrier: Are you a woman hiking with men? Need a desert pit stop? It’s nice to have instant privacy.

I had the grand plan of putting a solar panel on the umbrella to recharge my smartphone. I wasn’t able to thoroughly test this before starting the CDT. Within a week of starting, I ditched my smartphone and solar panel, thereby bringing my pack weight to under 6 pounds.
Don’t you need a jacket anyway?
Probably, but unless you’re hiking in freezing temperatures, an ultralight (sub-4-oz / 113-g) jacket is good enough. Despite all the advertising, there’s no such thing as a truly breathable rain jacket, while breathable shell jackets are much more breathable and lighter. My ultralight soft shell jacket weighs 3.5 ounces (99 g). The lightest rain jackets weigh 8 ounces (227 g), but they aren’t very pleasant in truly rainy weather. To get a good rain jacket that will keep you dry in a sustained downpour, you’ll need something that weighs closer to 12 to 16 ounces (340 to 454 g).
Compare that to an umbrella and soft shell jacket: 8.0 + 3.5 = 11.5 ounces (99 + 227 = 326 g). A good rain jacket can easily weigh 25-50% more than an umbrella and soft shell jacket combo.
I use a soft shell jacket for light protection against wind, rain, cold, and mosquitoes. If it’s warmth you’re wanting, a fleece or insulated jacket will do a better job than a rain jacket, and if you want to stay dry, the umbrella trumps the rain jacket too, especially if it’s warm enough to make you sweat with the rain jacket on.
Do your arms get tired holding the umbrella?
I never get tired of holding the umbrella, and I often have it deployed for ten hours a day. There are two secrets to guard against fatigue:
- Get a light umbrella (10 oz / 283 g or less). I prefer the GoLite Chrome Dome, which weighs about 8 ounces (99 g).
- Lean the umbrella against your body and switch hands occasionally.
Often the angle of the sunlight allows you to rest the umbrella shaft against your shoulder. While you still have to hold the handle, the weight is distributed against your body/chest/shoulder, so it doesn’t feel heavy at all. If you do get fatigued, just switch hands, angling the umbrella across your body/neck as needed to protect the exposed side. When the sun is setting in front of you, you have to hold the umbrella out in front of you. This is the most taxing position, but it rarely lasts long, since the sun sets, trees block it at that angle, or the trail changes direction.

Colorado, going south. In the afternoon, the sun hits your front, which forces you to hold your umbrella in the least comfortable position.
Lastly, even when there’s no sun, I often put both hands under my backpack’s straps, around my chest. This alleviates a little bit of the pressure on my shoulders from walking with a backpack for 12-14 hours a day. Moreover, when I have my hands at my sides, blood tends to accumulate in them, which is uncomfortable. Having my hands under the straps keeps my hands from swelling, and because my hands are already at my chest and under the straps, it requires practically no extra effort to hold the umbrella’s shaft right there.
What about fixing the umbrella to your backpack so you don’t have to hold it?
Although some hikers like to jury rig a place to prop their umbrella on their pack (so that they don’t have to hold it), the umbrella is then fixed, while the sun’s position and trail are constantly changing. Adjustability provides optimum shade. If you’re going to carry a half-pound piece of gear, you might as well use 100% of it, not 25% of it.

Wyoming’s Great Divide Basin was glorious in June after a snow-filled Colorado in May.
Unless the sun is directly overhead, propping the umbrella will provide sub-optimum coverage. If the sun is at an angle, then an umbrella that is pointed straight up is only protecting your head from the sun, whereas a tilted umbrella can cover 80% of your body (often, the only unprotected part of my body was just below my knees). If you’re interested in only protecting your face from the sun, just get a wide-brimmed hat.
What about umbrellas with reflective canopies?
I have put thermometers under an umbrella with reflective material alongside one with black material. My tests were not scientific, but I was disappointed with the results. Yes, the reflective umbrella is cooler than the black one, but the difference is small, just a couple of degrees. Perhaps it’s just psychological, but it sure feels cooler under a reflective canopy. Despite the only minor temperature difference, I recommend the reflective canopy. It’s only $10 more, and the umbrella will last for many years. You’ll appreciate those extra degrees when you’re walking across a hot desert.
One thing is clear: any umbrella has a dramatic effect on shielding you from a hot, dry sun, more so than a sunhat, which has smaller coverage and traps heat. While traversing 44 kilometers (20 miles) of exposed beach in Costa Rica, I bumped into a red man. He was sunburned and said that he had heatstroke the day before after just 5 kilometers (3 miles). When he saw me, he said, “Duh! Now that’s what I should have taken!”
If umbrellas are so great, why don’t people use them more often?
- Some hikers can’t let go of their trekking poles. Himalayan Sherpas carry far more weight than the typical backpacker, and their joints don’t let them down. If you lighten your total pack weight to under 10 kg (22 pounds), then you may discover that trekking poles are no longer necessary. Try it. Drink so much water that your pee is always clear – this means you’re well hydrated. Many joint-related injuries could be prevented if people were better hydrated.
- Backpacking gear manufacturers don’t want you to consider umbrellas. A nice rain jacket costs $300. A nice umbrella costs $30. You don’t need an MBA to figure out why the backpacking industry doesn’t want to encourage hikers to use umbrellas. If umbrellas could somehow cost $400, more manufacturers would promote their utility. Even GoLite, one of the few outdoor companies that makes umbrellas, buries their two umbrella models deep in their catalog. Part of the reason they do that is that there’s simply not that much demand for umbrellas. We should be grateful that they haven’t eliminated umbrellas from the product line.
Don’t umbrellas break?
Good ones are hard to break. GoLite and other backpacking-specific umbrellas (like MontBell models) are different than the standard $5 collapsible umbrella. The reason so many people believe umbrellas are weak is that they’ve only used cheap umbrellas. It’s like someone believing that all cars are slow, but they’ve never driven a Ferrari. Although my GoLite umbrella has never broken despite 20,000 km of backpacking, it can happen.

Theresa, the manager of the Monarch Mountain Lodge, which is 6 miles off of the CDT (near Monarch Pass), is helping me hold what’s left of my rain pants about halfway through Colorado in mid-May. My jacket was shredded about a week later.
Just as every other piece of gear you own can break. Your tent poles can break. Your stove can break. Your inflatable pad can puncture. Your sleeping bag can get soaking wet. Your backpack’s straps can snap. And yes, even your rain jacket can break. The jacket’s zipper may fail, or the fabric tears in a fall or gets snagged. Wear and tear took down one of my rain jackets:
Unless a hurricane blows your umbrella out of your hand and carries it into the heavens, you’ll still have a broken umbrella. Just as a ripped rain jacket is still useful, so is a broken umbrella. During my Pyrenees hike, for example, a spoke on my $5 umbrella broke. I still used it for 40 more days of backpacking across Spain. Sure, it wasn’t as effective as when it was new, but it was 80% effective at stopping sun and rain. While trekking in eastern Europe’s Carpathian Mountains, my cheap umbrella completely broke apart. Though it could not stay in a locked-open position, I was still able to rest the canopy on my head and get some effective coverage and protection.
Moreover, when an umbrella breaks, it’s similar to when other gear breaks: it usually doesn’t completely fail in one second. A small tear will appear. One or two spokes will break. It’s not as though the entire canopy will suddenly disappear in one gust and leave you with just the umbrella’s broken skeleton in your hand. Nevertheless, let’s consider the Mary Poppins nightmare: the umbrella flies away. Are you going to die? Nah. You might not even get wet. First, assuming you’re carrying a tarp/tent, you can just camp and wait out the rainstorm. If you want to keep moving, you can wrap yourself up in your tarp, your tent’s fly, or your groundsheet. Voila, instant poncho! It’s not as elegant as an umbrella, but you’re not going to die, and you may not even get that wet.
Skeptics say, “But I ain’t gotta worry about such worst case scenarios with my rain jacket – ain’t no way that thing is gonna blow off my back and fly away.” True, but it can still vanish. How? It can fall out if it’s strapped to the side of your backpack. You can accidentally leave it behind at a rest stop or campsite. The point is that rain jackets aren’t immune to catastrophic failure either.
The bottom line is that if your umbrella breaks, it is probably still going to be at least marginally functional long enough to get to civilization. Even if your umbrella flies away, it’s not the end of the world. Lastly, remember that it’s extremely hard to break a well made umbrella, especially if you’re handling it properly.

My cheap umbrella was useful in the sunny days in the Pyrenees.
How do you deal with powerful wind-driven rain?
Managing wind-driven rain is easier than you think. Just hold the shaft with two hands and let the canopy bend against your body. No matter how hard that rain/wind comes, the canopy won’t snap because it’s bumping up against your body and pack.
In extreme conditions where I really fear the wind (100+ kph), I will press the release button so that the umbrella is on its way to collapsing (as if I were going to stow it away). If a massive gust comes (one that could theoretically snap the umbrella), all that will happen is that the umbrella will collapse into the stow-away position. It won’t snap.
Rainstorms don’t usually break umbrellas: the rain and wind are coming from the same direction. A sunny, windy day is most likely to cause breakage: the sun and umbrella are on your right and the wind comes from your left, for example. A strong gust could invert your umbrella. Therefore, remember to ignore the sun if it’s also windy. Make the umbrella face the wind, at least partially. You’ll always find an angle that provides at least 50% sun protection without risking inversion. It takes a bit of practice. I’ve inverted my good umbrella a few times, but I’ve been able to just pop it back into position without any ill effect.
When shouldn’t you use an umbrella?
- When you’re backpacking in snow. You get 50% of the sun’s impact reflecting off the snow itself. While using an umbrella isn’t completely useless, it is only half as effective as it is when you’re on snow-free ground.
- When daytime temps are close to (or below) freezing. At such cold temperatures, most people will want more than a featherlight wind jacket, which is when a rain jacket can be more useful. Umbrellas excel in most three-season backpacking when it’s not near (or below) freezing. If daytime temps are above 5 C (41 F), I’ll carry an umbrella.
- When you plan to do nonstop bushwhacking. Big Sur’s Ventana Wilderness (in California) has many trails that are heavily overgrown. I just led with the umbrella, which plowed through soft brush easily. Still, if you plan to spend days trekking off-trail through a dense, prickly vegetation, a rain jacket might be better protection than an umbrella.
- When you expect to need both hands for extended periods. When you’re traveling through snow all day long, you’ll probably need an ice axe. If it’s raining (or snowing) while you’re traversing a steep icy slope, it’s cumbersome (and dangerous) to hold an umbrella at the same time. You’ll have the same issue if the trail is so steep that you need to use your hands.
Often, most of the above such moments are brief (taking a few seconds or a few minutes), and your wind jacket will usually provide enough protection from the rain during that short duration. For example, I went through the Mahoosuc Notch while it was raining. That’s one mile of trail that requires you to use your hands most of the time as you negotiate between boulders. A rain jacket would have been better for that mile, but I still could use my umbrella most of the rest of the trek. I just stowed my umbrella and let my featherlight wind jacket get a little wet while I climbed a rock.
On the other hand, I certainly didn’t take an umbrella up Mont Blanc!
Should you ever have a rain jacket AND an umbrella?
Yes, when you’re hiking in some place like Olympic National Park, where it’s usually raining. In that prolonged wet situation, having two layers is nice. There have been a few times where I’ve been in four days of nonstop rain. In such conditions, it’s practically impossible to stay dry unless you’re wearing one of those thick yellow fisherman’s outfits. However, having a rain jacket and umbrella combo will help.

Umbrellas provided Maiu some nice shade in the hot Section O of the PCT during a short break.
Conclusion
Some backpackers don’t consider using umbrella because they don’t want to look like a wuss. It’s like a professional wrestler wearing a pink outfit. Backpackers have an independent, I-defy-the-world spirit. However, some are still worried about how they look. If you’re one of these, console yourself that some of the most extreme backpackers use umbrellas (e.g., Ray Jardine, Scott Williamson, The Onion, Lint, NITRO, and many others).
For those who are wedded to their trekking poles, I encourage you to have an affair with an umbrella. Just try it. Start with a day hike. Rediscover your bipedalism!
On the other hand, most backpackers think I’m nuts. Although I encourage you to give an a shot, what’s more important is that you hike your own hike and use whatever rain protection makes you happiest.
Francis Tapon is the first person to yo-yo the Continental Divide Trail. He has backpacked over 12,500 miles (20,000 km) with an umbrella. He is the author of Hike Your Own Hike and, most recently, The Hidden Europe. Both books and his backpacking videos are available at his website. He does not sell umbrellas.
Citation
“Backpacking and Hiking with an Umbrella,” by Francis Tapon. BackpackingLight.com (ISSN 1537-0364).
http://backpackinglight.com/cgi-bin/backpackinglight/backpacking_and_hiking_with_an_umbrella.html, 2012-02-07 00:00:00-07.
Related Articles

M Mountain SuperUltraLight Backpacking – Going SUL in the Mountains with Adequate Shelter, Insulation, and Rain Protection. Part 1: Concepts and Scope.
on May 08, 2013 in Techniques »Techniques & Best Practices


M Mountain SuperUltraLight Backpacking – Going SUL in the Mountains with Adequate Shelter, Insulation, and Rain Protection. Part 2A: Selecting the Lightest, Most Functional Gear – Backpack, Shelter, Sleeping Bag, Sleeping Pad
on May 15, 2013 in Techniques »Techniques & Best Practices

M The Global Test Part II: Evaluating System Efficiency for a Round-the-World Journey
on May 10, 2011 in Gear » Gear Lists
Navigating

Characteristics of an expert navigator: Introduction
Learning how to navigate was one of the most important and liberating skills that I have developed as a backpacker. On my earliest trips, when my navigation skills were at best rudimentary, I was unable to safely or confidently leave the security of obvious footpaths, foolproof blazes, and accurate signage. I also struggled to reliably […]

Characteristics of an expert navigator: Part I — Equipped with proper tools
This is Part I of a series on the characteristics of an Expert Navigator. Read the Introduction. More installments are forthcoming. Every “Ten Essentials” list I’ve seen has included a map and compass, and modern versions sometimes also include a GPS. If only the first characteristic of an expert navigator — being equipped with proper […]

Characteristics of an expert navigator: Part II — Proficiency in the understanding and uses of tools
This post is part of a series on the characteristics of expert navigators. I’d recommend first reading the Introduction and Part I, and then returning to this latest installment. Within a few days of starting my Appalachian Trail thru-hike in 2002, I began dead-reckoning using my watch and the Databook. With surprising accuracy, I now had […]
Clothing – Backpacking
http://andrewskurka.com/2013/clothing-system-for-backpacking-peak-mosquito-season/
http://andrewskurka.com/2015/backpacking-core-clothing-thirteen-3-season-conditions/
http://andrewskurka.com/2015/backpacking-clothing-go-suit-short-long-sleeve-shirt/
http://andrewskurka.com/2015/backpacking-clothing-go-suit-bug-shirt/
http://andrewskurka.com/2015/core-clothing-go-suit-running-shorts/
http://andrewskurka.com/2015/core-clothing-go-suit-pants-underwear/
http://andrewskurka.com/2015/backpacking-clothing-go-suit-fleece-top/
http://andrewskurka.com/2015/backpacking-clothing-stop-insulated-jacket-pants/
http://andrewskurka.com/2015/backpacking-clothing-rain-jacket-rain-pants/
http://www.mountainlaureldesigns.com/shop/product_info.php?products_id=66
Popovers
Perfect Popovers (& How to Clean & Reseason Cast Iron)
See this later post for a more scientifically sound seasoning technique:
http://sherylcanter.com/wordpress/2010/01/a-science-based-technique-for-seasoning-cast-iron/
My fascination with popovers began with a new cookbook I purchased just before Christmas. This led to a search for the perfect popover pan, which turned out to be antique Griswold cast iron. That, in turn, led to intensive research on how to restore an old cast iron pan covered with rust and crud. I succeeded, as you can see in the picture below. In this post I’ll describe how to restore a cast iron pan, and then use it to make perfect popovers.

My first popover efforts used pyrex cups. It worked pretty well, but I wanted to see if I could get them to rise even higher in cast iron, the “gold standard” in popover pan perfection.

 |
Lodge Logic makes a cast iron popover pan, but it doesn’t have the space between the cups that I read is important. So I turned to eBay and found an antique Griswold popover pan that was perfect. It was no big surprise that the perfect popover pan would be a Griswold because old (pre-1940) Griswold pans are widely considered to be the best cast iron cookware ever made, and are highly collectible. |
I wasn’t looking specifically for a collectible pan, just one that was well made, not too pricey, and in good enough condition to be used (perhaps after restoration). Here’s the one I bought – these are the original pictures from the eBay listing:
 |
 |
I could see from the listing pictures that there was rust under the seasoning, but I couldn’t see any significant pitting so I thought I could restore the pan to usable condition (though, admittedly, I had never done such a thing before).
Removing the Crud
When I received the pan, I found it had a fair amount of crud on it, and felt a little sticky from a bad seasoning job. The ideal way to clean cast iron is through electrolysis, which cleans off both crud and rust. An electrolysis setup involves a car battery charger, a large plastic tub, stainless steel pipes, and good ventilation – none of which I have in my tiny NYC apartment in the dead of winter. And even if I did have these things, I’d be afraid of doing something wrong and blowing myself up.
Another good method is a self-cleaning oven, but there are some risks. There have been reports of the crud catching on fire inside the oven, which is locked during the cleaning cycle so you can’t open it and put out the fire. There is also a risk of warping the pan at self-cleaning temperatures, which are 900-950°F. Most of the time, neither of these bad things happen and it works great, but I don’t have a self-cleaning oven.
Next best is a lye bath, which cleans off crud and old seasoning, but not rust (that requires a second step). That was also a no-go for me due to the lack of a plastic tub, and my general fear of substances that could explode and kill me. But oven cleaner usually contains lye, and I thought I could handle oven cleaner.
Oven Cleaner Method
I put some cardboard down in the bathtub and laid the pan on the cardboard. Before spraying thoroughly on both sides, I suited up like an astronaut – long rubber gloves (double, thin latex underneath, in case there was a tear), double mask over my nose and mouth (one isn’t enough – you still breath vapors), and goggles over my eyes. This is not excessive precaution. I somehow got a drip of oven cleaner on my upper arm and it burned right through my skin. I flushed it very thoroughly in water and then dabbed on some yogurt since lye is base and yogurt is acid – that soothed it.
After thoroughly spraying the pan with oven cleaner, I popped it into a large, thick plastic bag, closed the bag tightly, and put it in a small plastic wash tub in the general vicinity of my radiator so heat could help it along (not on the radiator, of course, just near it). I waited 24 hours, then donned the gloves again and took a look. A rinse and a scrub told me it needed another dose. I again suited up like an astronaut, sprayed it down again, and put it back in the sealed plastic bag near the radiator.
Twenty-four hours later I looked again, and this time all the crud was gone. But the pan was covered in thick rust that went way beyond my scrubbing ability. I didn’t take a picture of the bottom of the pan, but even the letters on the bottom were encrusted with rust.
Removing the Rust
Removing crud from the pan is dangerous to you but not to the pan.  Lye does not damage iron. Removing the rust is just the opposite. You remove rust with a 50/50 solution of distilled white vinegar and water. This is safe for you but can destroy iron if you leave it in there too long. (Electrolysis is a safer method for the pan because it removes rust as well as crud so you can skip this step.)
When you put a pan in a vinegar and water solution, it sort of simultaneously rusts and derusts. The vinegar will cause the excess rust to lift off the pan and bubble up, but when you take it out of the solution it instantly starts rusting because the iron is utterly unprotected. A very thin film of rust is unavoidable – you just oil the pan and wipe it off that way. Don’t leave the pan in the vinegar indefinitely waiting for it to come out perfectly gray. It never will.
You want to leave the pan in the vinegar for the shortest time possible, so check it frequently, and never leave it in the vinegar solution for more than 24 hours. I checked the pan every couple of hours. At about the 12 hour mark I dumped out the rusty solution and put in new, clean solution. A few hours later, no more rust was bubbling up from the pan so I figured it was done.
I removed it from the vinegar solution and scrubbed it down with washing soda (like baking soda, but much stronger) to make sure the vinegar was complete neutralized. Washing soda is base; vinegar is acid. Then I put it in a 200 degree oven to make sure it was bone dry. When I took it out, I oiled it all over with avocado oil. I’ll explain the reason for avocado oil in the next section.
I want to emphasize how important it is at this point to rinse all the vinegar off using washing soda to neutralize, thoroughly dry the pan, and then thoroughly oil it. Do not wait even 10 minutes to do this because the pan is already rusting and you must stop the process.
Here’s how the pan looked after drying but before oiling:
 |
 |
And here’s how the pan looked after oiling but before seasoning:
 |
 |
Rub the pan really well all over with oil – especially in crevices – to wipe away the surface rust. Change paper towels frequently! You’re cleaning it with the oil. When you stop seeing rust on the paper towel, you can start seasoning. Note that you’ll still see dark residue from the iron before the pan is seasoned – that’s normal.
Notice how the pan is a medium gray, and not the black usually associated with cast iron? That’s because you’ve cleaned it down to the metal, which is gray. It’s the seasoning that makes it dark. That comes next.
Seasoning Cast Iron
To “season” a cast iron pan means to create a slick, glassy coating by baking on multiple thin coats of oil. This is necessary for two reasons:
- It protects the iron from rust.
- It makes for a glassy nonstick surface that’s better than any commercial nonstick surface, and far better for you.
(If you didn’t know that commercial nonstick pans contain extremely dangerous toxins, now you know. These toxins are released when the pan is old and the surface starts flaking into your food, or when you heat the pan above medium-low temperature, which people do all the time. Pet birds will drop dead of fumes from an overheated nonstick pan, and the fumes not so great for humans, either.)
When you start to research how to properly season cast iron, you quickly realize that no one fully understands the science behind it, and advice is based on folklore and superstition. Do you use solid fat or liquid fat? If liquid, should it be polyunsaturated or monounsaturated? Should you bake it at high temperature or low? Should you heat it above the smoke point of the oil you use, or below? You’ll find ardent supporters of all these practices on the internet.
I can’t say that the method I used is the only way or even the best way, but I did end up with a beautifully seasoned pan, as you can see. Compare these pictures to the ones above with the purple background, before the pan was cleaned. Much better!
 |
 |
Start with Avocado Oil…
It seemed to me that the important factor here was polymerized fat. That’s what’s so hard, glassy, and slick. The black color (as opposed to deep brown) comes from burnt material – carbon – bound up in the polymerized fat when you bake the pan above the oil’s smoke point. I didn’t like the idea of doing that because heating oil above its smoke point releases free radicals, which are carcinogenic. That’s why you never ever want to heat oil above the smoke point when cooking. I liked the idea of a monounsaturated oil because it doesn’t go rancid. You don’t need to refrigerate olive oil, which is mostly monounsaturated. And I thought that high oven temperature made more sense than medium or low for creating a hard glassy surface rather than a sticky surface.
Putting all that together, I decided to use avocado oil, which is monounsaturated and has the highest smoke point of any edible oil (see this chart of smoke points). Avocado oil doesn’t smoke until 520°F. If I had a decent oven I’d have baked it at 500°F, but unfortunately my oven only goes up to 450°F, so that’s what I used.
Coat every surface of the pan with the oil and then wipe it off with a paper towel so it’s very thin. You do not want pools of oil on your pan or they will stay forever sticky and you’ll have to strip it back down with the lye and start again. After oiling, put the pan face down in a cold oven (face down so as little surface is touching the rack as possible). Put a pan or some foil below the rack to catch any drips, but it should not be dripping much if your coat of oil is sufficiently thin. Then turn up the heat to 500°F (or as high as your oven can bake). When it’s done preheating, set your timer for an hour. When an hour has passed, turn off the oven and leave the pan inside without opening the door until it’s cool enough to handle. That takes at least two hours.
Then take the pan out of the oven, and rub it with oil and bake it again. And again. And again. And again. And again. And again. You need at least six coats of seasoning because each coat must be very thin. You can’t speed this up. If you use too thick a coat of oil, it will never get hard and you’ll have to strip it all off and start over.
…Then Two Coats with Bacon Fat
After six coats I started to wonder if the glaze would ever be sufficiently thick, so in frustration I added two coats using a different technique. Instead of avocado oil, I oiled the pan with strained drippings from some bacon I bought at the Farmer’s Market – no nitrates or other chemicals in it. Again I wiped it out with a paper towel so it was very thin, but saturated fat (fat that’s solid at room temperature) always goes on thicker than liquid fat. I then baked it for two hours at 350°F and let it cool down in the closed oven.
When the pan had cooled, I opened the oven door and put a finger on the pan. It felt a little sticky, so I closed the oven door and cranked the temperature up to 450°F, leaving the pan in the oven while it preheated. When the oven was at 450°F, I set the timer for an hour, then turned off the oven and let the pan cool down in the oven. When I took it out, it had a thicker glaze on it and looked quite nice.
I went one more round with the strained bacon fat (organic! no nitrates!). The second time I baked it for one hour at 350°F, and then two hours at 450°F, letting it cool down in the closed oven. When I removed the pan, perfection!
Why start with the lower temperature when seasoning with bacon grease? It prevents smoking. I don’t know why, but it does. The smoke point of lard (pork fat) is 370°F. Baking it at 350°F changes it somehow so when I raise the temperature it doesn’t smoke. If you season a pan with lard without this first lower-temperature step, it will smoke like crazy. Reports on the internet warn you to open windows and door, turn on fans, etc. None of this is necessary if you bake it at 350°F first.
I’m not sure whether my pan got so lovely and well-seasoned after the bacon grease because it already had six coats of avocado oil on it (it did get darker with each application), or the bacon grease has some sort of special qualities. I’m about to season a skillet, so I’ll soon find out. Next time I’ll start with the bacon grease and see if I can get it to the beautiful point with fewer layers. I was starting to worry I’d wear out my oven (not to mention the damage to my electric bill).
Perfect Popovers
All of this was in quest of perfect popovers, so here is my popover recipe. I like to keep it very simple, just four ingredients: milk, egg, flour, salt. I’ve tried a little melted butter in the batter, but it rises less that way and I don’t find I need it for taste.
For the small, 6-cup popover pan I just cleaned (or three 6oz pyrex custard cups), you need:
- ½ cup whole milk
- 1 large egg
- ½ cup unbleached white flour (preferably with the germ)
- 1/8 tsp salt
I make it in a 2-cup pyrex measuring cup. Preheat the oven to 450°F. While that’s happening, pour ½ cup of milk into the measuring cup and crack in one egg. Beat that with a wire wisk. Add the salt and beat some more. Measure out ½ cup of flour and dump that in. Wisk it together until it’s smooth, then as soon as it’s smooth (no lumps) stop mixing. Don’t overmix it. Let the batter sit while the oven continues to preheat.
If you’re using cast iron rather than pyrex, rub avocado oil into the popover cups. At some advanced point when the pan is excruciatingly well seasoned this won’t be necessary, but for now it’s necessary to keep the popovers from sticking and it also serves to add seasoning to the pan. When the oven is preheated, put the popover pan into the oven to heat empty for five minutes. Your popovers will pop higher if the pan is preheated. You do this with oil rather than butter because the butter will burn.
When the hot pan comes out of the oven, put a tiny dab of butter in the bottom of each cup. This further ensures nonstickiness, adds seasoning to the pan, and adds flavor to the popovers. Then pour the batter into the cups – filling only about halfway. Don’t overfill the cups or they won’t pop sufficiently
Put the pan back in the oven, this time with the batter, and set your timer for 15 minutes. At the end of 15 minutes, lower the oven temperature to 350°F (do not open the oven!) and continue baking for another 15 minutes. (If you’re making them in 6oz pyrex cups, bake for 20 minutes at 350°F rather than 15 minutes.) When the popovers come out of the oven, they will look like the first picture in this blog post. Here it is again for good measure:
As soon as they’re out of the oven, pull them out of the pan (they should slide right out), put them on a cooling rack, and stab them with a small knife to release the steam inside so they don’t get soggy.
I like popovers for breakfast with butter and jam. They’re also good as sandwich bread for lunch. When they pop really high they’re hollow inside, and you can fill them with tuna salad.
So does cast iron make a difference? Popovers made in pyrex are perfectly good, but the ones made in cast iron are crispier on the outside and pop higher. And I enjoyed learning how to clean and season the pan.
Hike with Trekking Poles?
News and advice on outdoor gear from the
Appalachian Mountain Club and AMC Outdoors, our member magazine.
MONDAY, AUGUST 18, 2014
Do You Hike with Trekking Poles? Avoid this Common Mistake.
Trekking poles offer a slew of advantages—increased hiking stability, reduced knee compression, easier river crossings, ultralight shelter support, and more—but if you aren’t using them correctly, you’re not taking full advantage of their strengths.One of the most common mistakes—and one of the simplest to correct—has to do with how you use the trekking pole straps. With rare exception, every trekking pole features those dangly straps that emerge from the top of the grip. Used properly, they take considerable pressure off of your hands and transfer it instead to your wrists, allowing you to effectively use the poles without the need to tightly clench them with your hands. Used improperly, they do little more than serve as a leash for your poles.Here’s the error many people make. They insert their hands through the top of the straps and then grab the pole grip with the straps dangling loosely around their wrists.
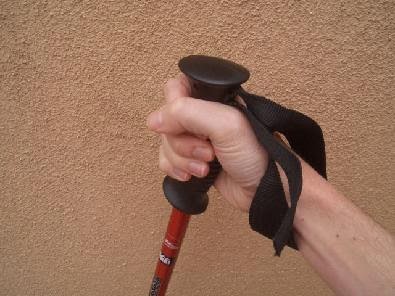 |
| Wrong. |
The correct way is to insert your hand through the bottom of the strap and position it so that the strap runs across your palm and then up between the thumb and index finger. The final step is to tighten (or loosen) the pole straps so that they are snug yet comfortable—adjust them so that they connect to the grip slightly above the top of your hand.
 |
| Right. |
The same advice applies for ski poles as well. Happy hiking!
Learn more:
Sticks and Stones: The Pros, Cons, and Uses of Trekking Poles
“Equipped” is an AMC Outdoors blog, written by Matt Heid.
The Dink Shot: Part 1- Definition & Examples
The Dink Shot: Part 1- Definition & Examples
I’ve covered many pickleball strategy topics in the nearly-two-years since I started my monthly newsletter, however it was recently brought to my attention (shockingly!) that I haven’t talked much about the dink shot — how to hit it, why you need it, etc. So (at long last) here are my best tips, tricks & strategies for hitting the dink shot.
First off, there are probably a good number of you (who may be relatively new to the game) who have never heard of the dink shot. No worries, we’ve all been there, Part 1 of this article series will be a great way for you to get up-to-speed on one of the most important elements of pickleball.
Then, there’s probably also another good chunk of you who have heard of the dink shot but are positivethat it’s a shot only for sissies, weaklings or children–and certainly not a shot that any man’s man or woman’s woman would ever hit… Hopefully Part 2 of this article series will help you see the light, but otherwise, contact me for a private lesson and I’ll quickly prove to you how essential– and powerful–the dink shot can be.
Lastly, there are those of you who already understand the significance of the dink shot and have tried, to whatever extent, to incorporate it into your game, but are always on the lookout for some pointers to hit your shots more easily and more reliably. That’s what Part 3 is all about. Please post your comment below to let me know how this article helps.
The Definition of the Dink Shot
The dink shot is a slower, softer shot hit from near the no-volley line, that drops downward once it crosses the net and lands in the opponent’s no-volley zone. When you hit this shot, it makes your opponent have to let the ball bounce before hitting it, which usually forces them to hit upward on the ball.
The Dink Shot Compared to The Drop Shot
The dink shot is different from the drop shot primarily because it is hit from/at the no-volley zone, whereas the drop shot is hit from the back half of the court. While the dink & the drop shot are similar in that they both head downward after crossing the net to land in the no-volley zone, the actual mechanics of hitting them are somewhat different, and the drop shot is usually a more challenging/advanced shot to hit than the dink shot. Many people who have mastered the dink shot still struggle with the drop shot, which is why I wrote my article, 4 Secrets to Get Your Dropshot to Go Where You Want (And Not Where You Don’t).
Characteristics of a Good Dink Shot:
Passes Low Over the Net
A good dink won’t bounce higher then the net, making it impossible for your opponent to hit the ball downward without hitting it into the net. If the dink passes too high over the net, then the ball will bounce higher than the net, allowing your opponent to hit downward on the ball (something you never want to give them a chance to do).
Lands Shallow in the Kitchen
A good dink will land in the shallow half of the kitchen. If your dink lands deeper in to the kitchen or at/past the no-volley line, then it’s more likely your opponent will be able to reach out and hit the ball before it bounces, which means they’ll have a better chance to hit downward on the ball.
Examples of Excellent & Good Dink Shots
These shots are low over the net and/or land in the shallow half of the kitchen.

Examples of Bad Dink Shots
These shots are too high, too deep or both.

The Dink Shot: Part 2 – Why You Need the Dink
The Dink Shot: Part 2 – Why You Need the Dink
Why You Need the Dink Shot
In my article, The Top 3 Reasons You MUST Play at The No-Volley Line I talk about how important it is to get up to the net and stay there. The dink shot is an essential element to being able to play at the no-volley line.
You need to be able to hit the dink shot because:
- It is a powerful strategy that better players will use against you. As a defensive strategy, if you can’t at least return a dink shot with another dink without hitting the ball into the net or giving your opponent a cream-puff, you’ll quickly lose the game.
- It is an excellent offensive strategy, which you can use against weaker opponents to goad them into hitting the ball into the net or giving you a cream-puff. Against players of equal-or-higher level, the dink shot gives you the opportunity to take control of the point, by defining the speed, angle and location of the ball.
Control the Speed of the Ball
Many players are so used to defending against a hard, fast ball that the slowness of a dink will mess up their timing, causing them to make an unforced error. Learning to slow the ball down and turn your opponent’s fast/hard shot into a dink does require some practice & finesse, but it IS possible & it’s a game-changer once you can do it. (It’s something that many of my students get MUCH better at after a private practice session.)
Control the Angle of the Ball
For those of you who fall into the category of thinking that only a sissy would hit a dink shot, check out the image below. If your opponent dinks to you, forcing you to let the ball bounce, if you hit a hard shot back, it will either go into the net or go over the net at an upward angle, which is really just another way of saying a losing angle. Because the higher you hit the ball up, the harder & faster a good opponent will hit the ball at your feet, putting you on the defensive. Still don’t buy it? Read The Top 3 Reasons You MUST Play at The No-Volley Line then contact me for a private lesson. ![]()

Control the Placement of the Ball
When you hit a dink shot, you have more time & opportunity to place the ball where you want it. With a series of good dinks, you can move your opponents back and forth on the court until you have created an opening where you can place the ball where they won’t get it.