
All posts by Wayne
When morale sucks on the Appalachian Trail
When morale sucks on the Appalachian Trail (Hiking tips Pt. 18)
Weird food habits on the Appalachian Trail
Weird food habits on the Appalachian Trail (Hiking tips Pt. 9)
Echo I Ultralight Tarp Cuben Fiber Beak
The Ultralight Echo I Beak is an almost unnoticeable addition to your pack with the potential to make all the difference to your comfort if caught in high winds or sideways rain.
QUEST OUTFITTERS catenary TARP
|
BSA Venturing Crew One Wind River Expedition (2015)
Apparently There Are 4 Kinds of Introversion
We’ve got a quiz, if you’re curious how you rank.
To The Best of Our Knowledge
Source: TTBOOK
Black’s Cozy and cook kit
How To Make An Ultralight Backpacking Pot Cozy
Ultralight Backpacking Pot Cozy DIY Instructions
Materials
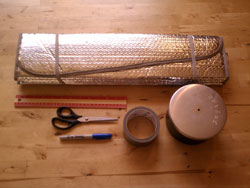
Materials to make a pot cozy
- Cook pot or mug*
- Auto Sun Shade made from Reflectix (looks like metallic bubble wrap)
- Duct tape
- Ruler
- Scissors
- Permanent Marker
*In this demo I’m using a “Walmart” Grease Pot, an ultralight, inexpensive alternative to titanium cook pots. It weighs just 4 ounces, holds approx 1.2 liters and costs only $7-$10. It is available from Walmart, Kmart, Target and Amazon.com
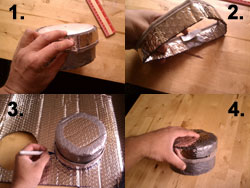
Part 1 – Making The Pot Cozy Sidewall
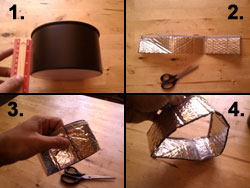
Making The Sidewall
1. Measure the distance from the bottom of the pot to the top lip.
2. Cut a strip of sunshade material that is the height of your measurement and as wide as the circumference of your pot plus a little extra.
3. Wrap the strip around the pot and trim the overlap so that the two ends but up against each other. The fit should be snug, but not tight.
4. Wrap a strip of duct tape around the two ends to connect them, forming a cylinder.
Tip: I use one of the existing seamed edges of the sunshade for the top opening. This makes it easier for the pot to slide in and out without snagging and prevents wear and tear. An alternative method is to protect the top edge with a strip of duct tape.
Part 2 – Making The Pot Cozy Base
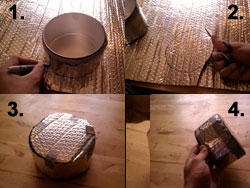
Making the base
1. With your pot inside the cozy cylinder, place it on the sunshade and trace a circle.
2. Cut the circle out. This will be the base of your pot cozy.
3. Leaving the pot inside the cozy, turn it upside down and attach the base to the side using small strips of tape, starting at opposite sides.
4. Continue attaching the base with small strips of duct tape all around the edge. Overlap each strip slightly to create an airtight seal.
Tips: Once the base is securely attached using small strips of duct tape you can wrap a single long strip around the exposed edges to prevent the tape from coming up. Your cook pot should now be able to easily slide in and out of your pot cozy.
Part 3 – Making The Pot Cozy Lid
Making the lid
1. Cut a strip from the sun shade that is 1.5″ tall and as wide as the circumference of the cozy with the pot inside, plus a little extra. Wrap it around the cozy and trim the overlap.
2. Tape the two ends with duct tape, forming a cylinder. This will be the side of your lid.
3. With the side of the lid in place turn the pot and cozy upside down and trace and cut another circle to make the top of the lid.
4. Attach the top of the lid to the side using small strips of duct tape like the base.
Tip: As with the base, you can use a long strip of duct tape around the cozy lid to prevent the tape edges from coming up during heavy use. Your lid should fit snugly enough around your pot and cozy that it doesn’t come off by itself, but not so tight it’s hard to put on.
Congratulations, you made a pot cozy!
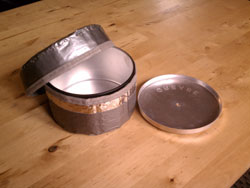
Completed ultralight backpacking pot cozy
Depending on the size of your pot your pot cozy should weight between 1.5 – 3 ounces and should last for thousands of miles.
A pot cozy will help you conserve fuel (and thus weight) and will provide a handy method of storing your cook pot and other cooking accessories (like lighters, alcohol stoves, camp towls, etc.) inside of your pack.
You can also use your pot cozy to comfortably hold a pot full of steaming hot food and eat your dinner without burning your hands.
How to use your pot cozy for cooking
There are two ways you can use your pot cozy when cooking meals on the trail:
Cooking Method #1 – Boil water in your cook pot, add dried food to the water, allow to simmer for a minute or two (if necessary), then remove the pot from the stove and place it inside your pot cozy for 15 minutes. Your food will continue to “cook” while you set up camp (or wait impatiently). When you are done you will have a hot meal waiting.
Cooking Method #2 – This is known as “freezer bag cooking”. Boil water in your cook pot, pour boiling water into a freezer ziploc baggy with dried food, seal the baggy and put it back inside your empty pot (removed from heat), and finally place the pot (with baggy and food inside) into your pot cozy and let it set for 15 minutes.
You can eat your food directly from the baggy (kept inside the pot cozy so you don’t burn yourself) and you won’t have to clean your pot afterward. This method works better with some foods than others (good for soft foods like mashed potatoes, pasta, cous cous… not so good for tough grains that require extended simmering or lots of time to rehydrate, like rice).
Eric the Black
http://blackwoodspress.com/blog/
Five Day Lightweight Backpacking Meal Plan
10 Ultralight Backpacking Foods
5 Lightweight Backpacking Dinner Recipes
How To Pack A Lightweight Backpack
http://www.lightweightrob.com/ (Rob McKay)
John Abela has put a ton of effort into building a comprehensive list of lightweight shelters. It’s organic and John is constantly updating this.
This will save you a heap of research time – Thanks John!
See the list at http://bit.ly/1gzDky6
Swiss Army Classic Pocket Knife
How To Train For A Long Distance Hike
5 Lightweight Backpacking Breakfast Cereal Recipes
7 More Ultralight Backpacking Foods

Here are 7 more backpacking foods that are lightweight, non-perishable and provide a high calorie-to-weight ratio, making them ideal for ultralight backpacking.